-t.m.k. Keyboard Firmware Collection
-====================================
-This is a keyboard firmware with some features for Atmel AVR controller.
+# Quantum MK Firmware
-Source code is available here: <http://github.com/tmk/tmk_keyboard>
+This is a keyboard firmware based on the [tmk_keyboard firmware](http://github.com/tmk/tmk_keyboard) with some useful features for Atmel AVR controllers, and more specifically, the [OLKB product line](http://olkb.co) and the [ErgoDox EZ](http://www.ergodox-ez.com) keyboard.
+QMK is developed and maintained by Jack Humbert of OLKB with contributions from the community, and of course, TMK.
-Features
---------
-* Multi-layer Keymap - Multiple keyboard layouts with layer switching.
-* Mouse key - Mouse control with keyboard
-* System Control Key - Power Down, Sleep, Wake Up and USB Remote Wake up
-* Media Control Key - Volume Down/Up, Mute, Next/Prev track, Play, Stop and etc
-* USB NKRO - 120 keys(+ 8 modifiers) simultaneously
-* PS/2 mouse support - PS/2 mouse(TrackPoint) as composite device
-* Keyboard protocols - PS/2, ADB, M0110, Sun and other old keyboard protocols
-* User Function - Customizable function of key with writing code
-* Macro - Very primitive at this time
-* Keyboard Tricks - Oneshot modifier and modifier with tapping feature
-* Debug Console - Messages for debug and interaction with firmware
+This documentation is edited and maintained by Erez Zukerman of ErgoDox EZ. If you spot any typos or inaccuracies, please [open an issue](https://github.com/jackhumbert/qmk_firmware/issues/new).
+## Important background info: TMK documentation
-Projects
---------
-### converter
-* ps2_usb - [PS/2 keyboard to USB][GH_ps2]
-* adb_usb - [ADB keyboard to USB][GH_adb]
-* m0110_usb - [Machintosh 128K/512K/Plus keyboard to USB][GH_m0110]
-* terminal_usb - [IBM Model M terminal keyboard(PS/2 scancode set3) to USB][GH_terminal]
-* news_usb - [Sony NEWS keyboard to USB][GH_news]
-* x68k_usb - [Sharp X68000 keyboard to USB][GH_x68k]
-* sun_usb - Sun to USB(type4, 5 and 3?)
-* usb_usb - USB to USB(experimental)
+The documentation below explains QMK customizations and elaborates on some of the more useful features of TMK. To understand the base firmware, and especially what *layers* are and how they work, please see [TMK_README.md](/TMK_README.md).
-### keyboard
-* hhkb - [Happy Hacking Keyboard professional][GH_hhkb]
-* macway - [Compact keyboard mod][GH_macway]
-* hbkb - [Happy Buckling sprint keyboard(IBM Model M mod)][GH_hbkb]
-* IIgs_Standard - Apple IIGS keyboard mod(by JeffreySung)
-* hid_liber - [HID liberation controller][HID_liber](by alaricljs)
-* phantom - [Phantom keyboard][PHANTOM] (by Tranquilite)
-* gh60 - [GH60 keyboard][GH60]
+## Getting started
-[GH_macway]: http://geekhack.org/showwiki.php?title=Island:11930
-[GH_hhkb]: http://geekhack.org/showwiki.php?title=Island:12047
-[GH_ps2]: http://geekhack.org/showwiki.php?title=Island:14618
-[GH_adb]: http://geekhack.org/showwiki.php?title=Island:14290
-[GH_hhkb_bt]: http://geekhack.org/showwiki.php?title=Island:20851
-[GH_m0110]: http://geekhack.org/showwiki.php?title=Island:24965
-[GH_news]: http://geekhack.org/showwiki.php?title=Island:25759
-[GH_terminal]: http://geekhack.org/showwiki.php?title=Island:27272
-[GH_x68k]: http://geekhack.org/showwiki.php?title=Island:29060
-[GH_hbkb]: http://geekhack.org/showwiki.php?title=Island:29483
-[HID_liber]: http://deskthority.net/wiki/HID_Liberation_Device_-_DIY_Instructions
-[PHANTOM]: http://geekhack.org/index.php?topic=26742
-[GH60]: http://geekhack.org/index.php?topic=34959
+* [BUILD_GUIDE.md](BUILD_GUIDE.md) contains instructions to set up a build environment, build the firmware, and deploy it to a keyboard. Once your build environment has been set up, all `make` commands to actually build the firmware must be run from a folder in `keyboard/`.
+* If you're looking to customize a keyboard that currently runs QMK or TMK, find your keyboard's directory under `keyboard/` and run the make commands from there.
+* If you're looking to apply this firmware to an entirely new hardware project (a new kind of keyboard), you can create your own Quantum-based project by using `./new_project.sh <project_name>`, which will create `/keyboard/<project_name>` with all the necessary components for a Quantum project.
+### Makefile Options
+You have access to a bunch of goodies! Check out the Makefile to enable/disable some of the features. Uncomment the `#` to enable them. Setting them to `no` does nothing and will only confuse future you.
-Build & Program
----------------
-### Install Tools
-First, you need tools to build firmware and program your controller. I assume you are on Windows here.
+ BACKLIGHT_ENABLE = yes # Enable keyboard backlight functionality
+ MIDI_ENABLE = yes # MIDI controls
+ UNICODE_ENABLE = no # <-- This is how you disable an option, just set it to "no"
+ BLUETOOTH_ENABLE = yes # Enable Bluetooth with the Adafruit EZ-Key HID
-1. Install [WinAVR][winavr]. This is old but works well for this purpose. `WinAVR` is a tool set to build firmware including C compiler(gcc) and make commands. You can use [CrossPack][crosspack] instead if you are on Mac.
+### Customizing Makefile options on a per-keymap basis
-2. Install [Atmel FLIP][flip]. `FLIP` is a tool to program(load) firmware into AVR controller(ATMega32u4) via DFU bootloader. ATMega32u4 has DFU bootloader by factory default. You can use [dfu-programmer][dfu-prog] instead if you are on Mac.
+If your keymap directory has a file called `makefile.mk` (note the lowercase filename, and the `.mk` extension), any Makefile options you set in that file will take precedence over other Makefile options (those set for Quantum as a whole or for your particular keyboard).
-3. Install driver for DFU bootloader. At first time you start DFU bootloader on Chip 'Found New Hardware Wizard' will come up on Windows. If you install device driver properly you can find chip name like 'ATmega32U4' under 'LibUSB-Win32 Devices' tree on 'Device Manager'. If not you shall need to update its driver on 'Device Manager'. You will find the driver in `FLIP` install directory like: C:\Program Files (x86)\Atmel\Flip 3.4.5\usb\. If you use `dfu-programmer` install its driver.
+So let's say your keyboard's makefile has `CONSOLE_ENABLE = yes` (or maybe doesn't even list the `CONSOLE_ENABLE` option, which would cause it to revert to the global Quantum default). You want your particular keymap to not have the debug console, so you make a file called `makefile.mk` and specify `CONSOLE_ENABLE = no`.
-If you use PJRC Teensy you don't need step 2 and 3, just get [Teensy loader][teensy-loader].
+## Quick aliases to common actions
+Your keymap can include shortcuts to common operations (called "function actions" in tmk).
-### Download source
-You can find firmware source at github: https://github.com/tmk/tmk_keyboard
+### Switching and toggling layers
-If you are familiar with `Git` tools you are recommended to use it.
-If not you can download zip archive from: https://github.com/tmk/tmk_keyboard/archive/master.zip
+`MO(layer)` - momentary switch to *layer*. As soon as you let go of the key, the layer is deactivated and you pop back out to the previous layer. When you apply this to a key, that same key must be set as `KC_TRNS` on the destination layer. Otherwise, you won't make it back to the original layer when you release the key (and you'll get a keycode sent). You can only switch to layers *above* your current layer. If you're on layer 0 and you use `MO(1)`, that will switch to layer 1 just fine. But if you include `MO(3)` on layer 5, that won't do anything for you -- because layer 3 is lower than layer 5 on the stack.
+`LT(layer, kc)` - momentary switch to *layer* when held, and *kc* when tapped. Like `MO()`, this only works upwards in the layer stack (`layer` must be higher than the current layer).
-### Build firmware
-1. Open terminal window to get access to commands. You can use `cmd` in Windows or `Terminal.app` on Mac OSX. In Windows press `Windows` key and `R` then enter `cmd` in Run command dialog showing up.
+`TG(layer)` - toggles a layer on or off. As with `MO()`, you should set this key as `KC_TRNS` in the destination layer so that tapping it again actually toggles back to the original layer. Only works upwards in the layer stack.
-2. Move to project directory in the firmware source.
+### Fun with modifier keys
- cd tmk_keyboard/{keyboard or converter}/<project>
+* `LSFT(kc)` - applies left Shift to *kc* (keycode) - `S(kc)` is an alias
+* `RSFT(kc)` - applies right Shift to *kc*
+* `LCTL(kc)` - applies left Control to *kc*
+* `RCTL(kc)` - applies right Control to *kc*
+* `LALT(kc)` - applies left Alt to *kc*
+* `RALT(kc)` - applies right Alt to *kc*
+* `LGUI(kc)` - applies left GUI (command/win) to *kc*
+* `RGUI(kc)` - applies right GUI (command/win) to *kc*
+* `HYPR(kc)` - applies Hyper (all modifiers) to *kc*
+* `MEH(kc)` - applies Meh (all modifiers except Win/Cmd) to *kc*
+* `LCAG(kc)` - applies CtrlAltGui to *kc*
-3. Build firmware using GNU `make` command. You'll see <project>_<variant>.hex file in that directory unless something unexpected occurs in build process.
+You can also chain these, like this:
- mkae -f Makefile.<variant> clean
- make -f Makefile.<variant>
+ LALT(LCTL(KC_DEL)) -- this makes a key that sends Alt, Control, and Delete in a single keypress.
+The following shortcuts automatically add `LSFT()` to keycodes to get commonly used symbols. Their long names are also available and documented in `/quantum/keymap_common.h`.
+ KC_TILD ~
+ KC_EXLM !
+ KC_AT @
+ KC_HASH #
+ KC_DLR $
+ KC_PERC %
+ KC_CIRC ^
+ KC_AMPR &
+ KC_ASTR *
+ KC_LPRN (
+ KC_RPRN )
+ KC_UNDS _
+ KC_PLUS +
+ KC_LCBR {
+ KC_RCBR }
+ KC_PIPE |
+ KC_COLN :
+`MT(mod, kc)` - is *mod* (modifier key - MOD_LCTL, MOD_LSFT) when held, and *kc* when tapped. In other words, you can have a key that sends Esc (or the letter O or whatever) when you tap it, but works as a Control key or a Shift key when you hold it down.
-### Program Controller
-Sock AVR USB chip including ATmega32U4 has DFU bootloader by factory default, you can use DFU tools for this purpose. `FLIP` is a DFU tool on Windows offered by Atmel. Open source command line DFU tool `dfu-programmer` also supports AVR chips, which run on Linux, Mac OSX and even Windows. If you have a PJRC Teensy you should use `Teensy Loader`.
+These are the values you can use for the `mod` in `MT()` (right-hand modifiers are not available):
-#### DFU bootloader
-To program AVR chip with DFU bootloader use `FLIP` or `dfu-programmer`.
-If you have a proper program command in `Makefile` just type this.
+ * MOD_LCTL
+ * MOD_LSFT
+ * MOD_LALT
+ * MOD_LGUI
-`FLIP` has two version of tool, GUI app and command line program. If you want GUI see tutorial section below.
-To use command line tool run this command. Note that you need to set PATH variable properly.
+These can also be combined like `MOD_LCTL | MOD_LSFT` e.g. `MT(MOD_LCTL | MOD_LSFT, KC_ESC)` which would activate Control and Shift when held, and send Escape when tapped.
- $ make -f Makefile.<variant> flip
+We've added shortcuts to make common modifier/tap (mod-tap) mappings more compact:
-To program with `dfu-programmer` run:
+ * `CTL_T(kc)` - is LCTL when held and *kc* when tapped
+ * `SFT_T(kc)` - is LSFT when held and *kc* when tapped
+ * `ALT_T(kc)` - is LALT when held and *kc* when tapped
+ * `GUI_T(kc)` - is LGUI when held and *kc* when tapped
+ * `ALL_T(kc)` - is Hyper (all mods) when held and *kc* when tapped. To read more about what you can do with a Hyper key, see [this blog post by Brett Terpstra](http://brettterpstra.com/2012/12/08/a-useful-caps-lock-key/)
+ * `LCAG_T(kc)` - is CtrlAltGui when held and *kc* when tapped
+ * `MEH_T(kc)` - is like Hyper, but not as cool -- does not include the Cmd/Win key, so just sends Alt+Ctrl+Shift.
- $ make -f Makefile.<variant> dfu
+### Temporarily setting the default layer
-#### Teensy
-If you have PJRC Teensy see instruction of `Teensy Loader` at: <http://www.pjrc.com/teensy/loader.html>
-Or use this command if you have command line version of Teensy Loader installed.
+`DF(layer)` - sets default layer to *layer*. The default layer is the one at the "bottom" of the layer stack - the ultimate fallback layer. This currently does not persist over power loss. When you plug the keyboard back in, layer 0 will always be the default. It is theoretically possible to work around that, but that's not what `DF` does.
- $ make -f Makefile.<variant> teensy
+### Prevent stuck modifiers
+Consider the following scenario:
-#### Other programmer
-You may want to use other you favorite programmer like `avrdude` with AVRISPmkII, Aruduino or USBasp. In that case you can still use make target `program` for build with configuring PROGRAM_CMD in Makefile.
+1. Layer 0 has a key defined as Shift.
+2. The same key is defined on layer 1 as the letter A.
+3. User presses Shift.
+4. User switches to layer 1 for whatever reason.
+5. User releases Shift, or rather the letter A.
+6. User switches back to layer 0.
- $ make -f Makefile.<variant> program
+Shift was actually never released and is still considered pressed.
+If such situation bothers you add this to your `config.h`:
+ #define PREVENT_STUCK_MODIFIERS
-#### FLIP GUI tutorial
-1. On menu bar click Device -> Select, then. `ATmega32u4`.
-2. On menu bar click Settings -> Communication -> USB, then click 'Open' button on 'USB Port Connection' dialog.
-At this point you'll see greyouted widgets on the app get colored and ready.
+This option uses 5 bytes of memory per every 8 keys on the keyboard
+rounded up (5 bits per key). For example on Planck (48 keys) it uses
+(48/8)\*5 = 30 bytes.
-3. On menu bar click File -> Load HEX File, then select your firmware hex file on File Selector dialog.
-4. On 'Operations Flow' panel click 'Run' button to load the firmware binary to the chip. Note that you should keep 'Erase', 'Blank Check', 'Program' and 'Verify' check boxes selected.
-5. Re-plug USB cord or click 'Start Application' button to restart your controller.
-Done.
+### Remember: These are just aliases
-See also these instaructions if you need.
+These functions work the same way that their `ACTION_*` functions do - they're just quick aliases. To dig into all of the tmk ACTION_* functions, please see the [TMK documentation](https://github.com/jackhumbert/qmk_firmware/blob/master/tmk_core/doc/keymap.md#2-action).
-- <http://code.google.com/p/micropendous/wiki/LoadingFirmwareWithFLIP>
-- <http://www.atmel.com/Images/doc7769.pdf>
+Instead of using `FNx` when defining `ACTION_*` functions, you can use `F(x)` - the benefit here is being able to use more than 32 function actions (up to 4096), if you happen to need them.
+## Macro shortcuts: Send a whole string when pressing just one key
-[winavr]: http://winavr.sourceforge.net/
-[crosspack]: http://www.obdev.at/products/crosspack/index.html
-[flip]: http://www.atmel.com/tools/FLIP.aspx
-[dfu-prog]: http://dfu-programmer.sourceforge.net/
-[teensy-loader]:http://www.pjrc.com/teensy/loader.html
+Instead of using the `ACTION_MACRO` function, you can simply use `M(n)` to access macro *n* - *n* will get passed into the `action_get_macro` as the `id`, and you can use a switch statement to trigger it. This gets called on the keydown and keyup, so you'll need to use an if statement testing `record->event.pressed` (see keymap_default.c).
+```c
+const macro_t *action_get_macro(keyrecord_t *record, uint8_t id, uint8_t opt) // this is the function signature -- just copy/paste it into your keymap file as it is.
+{
+ switch(id) {
+ case 0: // this would trigger when you hit a key mapped as M(0)
+ if (record->event.pressed) {
+ return MACRO( I(255), T(H), T(E), T(L), T(L), W(255), T(O), END ); // this sends the string 'hello' when the macro executes
+ }
+ break;
+ }
+ return MACRO_NONE;
+};
+```
+A macro can include the following commands:
+* I() change interval of stroke in milliseconds.
+* D() press key.
+* U() release key.
+* T() type key(press and release).
+* W() wait (milliseconds).
+* END end mark.
-Makefile Options
-----------------
-### 1. MCU and Frequency.
+So above you can see the stroke interval changed to 255ms between each keystroke, then a bunch of keys being typed, waits a while, then the macro ends.
- MCU = atmega32u4 # Teensy 2.0
- #MCU = at90usb1286 # Teensy++ 2.0
- F_CPU = 16000000
+Note: Using macros to have your keyboard send passwords for you is possible, but a bad idea.
-### 2. Features
-Note that ***comment out*** to disable them.
+### Advanced macro functions
- MOUSEKEY_ENABLE = yes # Mouse keys
- PS2_MOUSE_ENABLE = yes # PS/2 mouse(TrackPoint) support
- EXTRAKEY_ENABLE = yes # Enhanced feature for Windows(Audio control and System control)
- NKRO_ENABLE = yes # USB Nkey Rollover
+To get more control over the keys/actions your keyboard takes, the following functions are available to you in the `action_get_macro` function block:
-### 3. Programmer
-Optional. Set proper command for your controller, bootloader and programmer.
+* `record->event.pressed`
- # for PJRC Teensy
- PROGRAM_CMD = teensy_loader_cli -mmcu=$(MCU) -w -v $(TARGET).hex
+This is a boolean value that can be tested to see if the switch is being pressed or released. An example of this is
- # for Atmel chip with DFU bootloader
- PROGRAM_CMD = dfu-programmer $(MCU) flash $(TARGET).hex
+```c
+if (record->event.pressed) {
+ // on keydown
+} else {
+ // on keyup
+}
+```
- # avrdude with other methods
- PROGRAM_CMD = avrdude -p $(MCU) -c avrispmkII -P USB -U flash:w:$(TARGET).hex
- PROGRAM_CMD = avrdude -p $(MCU) -c usbasp -U flash:w:$(TARGET).hex
- PROGRAM_CMD = avrdude -p $(MCU) -c arduino -P COM1 -b 57600 -U flash:w:$(TARGET).hex
+* `register_code(<kc>);`
+This sends the `<kc>` keydown event to the computer. Some examples would be `KC_ESC`, `KC_C`, `KC_4`, and even modifiers such as `KC_LSFT` and `KC_LGUI`.
+* `unregister_code(<kc>);`
-Config.h Options
-----------------
-### 1. USB vendor/product ID and device description
- #define VENDOR_ID 0xFEED
- #define PRODUCT_ID 0xBEEF
- /* device description */
- #define MANUFACTURER t.m.k.
- #define PRODUCT Macway mod
- #define DESCRIPTION t.m.k. keyboard firmware for Macway mod
+Parallel to `register_code` function, this sends the `<kc>` keyup event to the computer. If you don't use this, the key will be held down until it's sent.
-### 2. Keyboard matrix configuration
- #define MATRIX_ROWS 8
- #define MATRIX_COLS 8
- #define MATRIX_HAS_GHOST
-
-### 3. Mouse keys
-
-### 4. PS/2 mouse
-
-### 5. COMMAND key combination
-
- #define IS_COMMAND() (keyboard_report->mods == (MOD_BIT(KB_LSHIFT) | MOD_BIT(KB_RSHIFT)))
-
-
-Keymap
-------
-Many of existent projects offer keymap framework to define your own keymap easily. The following will explain how you can define keymap using this framework.
- Instead, you can also implement your own `keymap_get_action()` to return action code for each key if you want.
-
-This is keymap example for [HHKB](http://en.wikipedia.org/wiki/Happy_Hacking_Keyboard) keyboard. Keymap is defined in `keymaps[]` array.
-
- static const uint8_t PROGMEM keymaps[][MATRIX_ROWS][MATRIX_COLS] = {
- /* Keymap 0: Default Layer
- * ,-----------------------------------------------------------.
- * |Esc| 1| 2| 3| 4| 5| 6| 7| 8| 9| 0| -| =| \| `|
- * |-----------------------------------------------------------|
- * |Tab | Q| W| E| R| T| Y| U| I| O| P| [| ]|Backs|
- * |-----------------------------------------------------------|
- * |Contro| A| S| D| F| G| H| J| K| L|Fn1| '|Enter |
- * |-----------------------------------------------------------|
- * |Shift | Z| X| C| V| B| N| M| ,| .| /|Shift |Fn0|
- * `-----------------------------------------------------------'
- * |Gui|Alt |Space |Alt |Fn2|
- * `-------------------------------------------'
- */
- KEYMAP(ESC, 1, 2, 3, 4, 5, 6, 7, 8, 9, 0, MINS,EQL, BSLS,GRV, \
- TAB, Q, W, E, R, T, Y, U, I, O, P, LBRC,RBRC,BSPC, \
- LCTL,A, S, D, F, G, H, J, K, L, FN1, QUOT,ENT, \
- LSFT,Z, X, C, V, B, N, M, COMM,DOT, SLSH,RSFT,FN0, \
- LGUI,LALT, SPC, RALT,FN3),
- /* Keymap 1: colemak */
- KEYMAP(ESC, 1, 2, 3, 4, 5, 6, 7, 8, 9, 0, MINS,EQL, BSLS,GRV, \
- TAB, Q, W, F, P, G, J, L, U, Y, SCLN,LBRC,RBRC,BSPC, \
- BSPC,A, R, S, T, D, H, N, E, I, O, QUOT,ENT, \
- LSFT,Z, X, C, V, B, K, M, COMM,DOT, SLSH,RSFT,FN0, \
- LGUI,LALT, SPC, RALT,FN2),
- };
-
- static const uint8_t PROGMEM overlays[][MATRIX_ROWS][MATRIX_COLS] = {
- /* Overlay 0: HHKB mode (HHKB Fn)
- * ,-----------------------------------------------------------.
- * |Pwr| F1| F2| F3| F4| F5| F6| F7| F8| F9|F10|F11|F12|Ins|Del|
- * |-----------------------------------------------------------|
- * |Caps | | | | | | | |Psc|Slk|Pus|Up | |Backs|
- * |-----------------------------------------------------------|
- * |Contro|VoD|VoU|Mut| | | *| /|Hom|PgU|Lef|Rig|Enter |
- * |-----------------------------------------------------------|
- * |Shift | | | | | | +| -|End|PgD|Dow|Shift | |
- * `-----------------------------------------------------------'
- * |Gui |Alt |Space |Alt |Gui|
- * `--------------------------------------------'
- */
- KEYMAP(PWR, F1, F2, F3, F4, F5, F6, F7, F8, F9, F10, F11, F12, INS, DEL, \
- CAPS,TRNS,TRNS,TRNS,TRNS,TRNS,TRNS,TRNS,PSCR,SLCK,PAUS,UP, TRNS,BSPC, \
- LCTL,VOLD,VOLU,MUTE,TRNS,TRNS,PAST,PSLS,HOME,PGUP,LEFT,RGHT,ENT, \
- LSFT,TRNS,TRNS,TRNS,TRNS,TRNS,PPLS,PMNS,END, PGDN,DOWN,RSFT,TRNS, \
- LGUI,LALT, SPC, RALT,RGUI),
- /* Overlay 1: Mouse mode (Semicolon)
- * ,-----------------------------------------------------------.
- * |Esc| F1| F2| F3| F4| F5| F6| F7| F8| F9|F10|F11|F12|Ins|Del|
- * |-----------------------------------------------------------|
- * |Tab | | | | | |MwL|MwD|MwU|MwR| | | |Backs|
- * |-----------------------------------------------------------|
- * |Contro| | | | | |McL|McD|McU|McR| | |Return |
- * |-----------------------------------------------------------|
- * |Shift | | | | |Mb3|Mb2|Mb1|Mb4|Mb5| |Shift | |
- * `-----------------------------------------------------------'
- * |Gui |Alt |Mb1 |Alt | |
- * `--------------------------------------------'
- * Mc: Mouse Cursor / Mb: Mouse Button / Mw: Mouse Wheel
- */
- KEYMAP(ESC, F1, F2, F3, F4, F5, F6, F7, F8, F9, F10, F11, F12, INS, DEL, \
- TAB, TRNS,TRNS,TRNS,TRNS,TRNS,WH_L,WH_D,WH_U,WH_R,TRNS,TRNS,TRNS,BSPC, \
- LCTL,TRNS,ACL0,ACL1,ACL2,TRNS,MS_L,MS_D,MS_U,MS_R,TRNS,QUOT,ENT, \
- LSFT,TRNS,TRNS,TRNS,TRNS,BTN3,BTN2,BTN1,BTN4,BTN5,SLSH,RSFT,TRNS, \
- LGUI,LALT, BTN1, RALT,TRNS),
- };
-
- static const uint16_t PROGMEM fn_actions[] = {
- ACTION_OVERLAY(0), // FN0
- ACTION_OVERLAY_TAP_KEY(1, KC_SCLN), // FN1
- ACTION_OVERLAY_TOGGLE(1), // FN2
- };
-
-
-
-### 1. Keycode
-See `common/keycode.h`. Keycode is 8bit internal code to inidicate action performed on key in keymap. Keycode has `KC_` prefixed symbol respectively. Most of keycodes like `KC_A` have simple action register key on press and unregister on release, on the other some of keycodes has some special actions like Fn keys, Media contorl keys, System control keys and Mouse keys.
-
- ***In `KEYMAP` definition you need to omit prefix part `KC_` of keycode to keep keymap compact.*** For example, just use `A` instead you place `KC_A` in `KEYMAP`. Some keycodes has 4-letter short name in addition to descriptive name, you'll prefer short one in `KEYMAP`.
-
-#### 1.0 Other key
-- `KC_NO` for no aciton
-- `KC_TRNS` for transparent layer
-
-#### 1.1 Normal key
-- `KC_A` to `KC_Z`, `KC_1` to `KC_0` for alpha numeric key
-- `KC_MINS`, `KC_EQL`, `KC_GRV`, `KC_RBRC`, `KC_LBRC`, `KC_COMM`, `KC_DOT`, `KC_BSLS`, `KC_SLSH`, `KC_SCLN`, `KC_QUOT`
-- `KC_ESC`, `KC_TAB`, `KC_SPC`, `KC_BSPC`, `KC_ENT`, `KC_DEL`, `KC_INS`
-- `KC_UP`, `KC_DOWN`, `KC_RGHT`, `KC_LEFT`, `KC_PGUP`, `KC_PGDN`, `KC_HOME`, `KC_END`
-- `KC_CAPS`, `KC_NLCK`, `KC_SLCK`, `KC_PSCR`, `KC_PAUS`, `KC_APP`, `KC_F1` to `KC_F24`
-- `KC_P1` to `KC_P0`, `KC_PDOT`, `KC_PCMM`, `KC_PSLS`, `KC_PAST`, `KC_PMNS`, `KC_PPLS`, `KC_PEQL`, `KC_PENT` for keypad.
-
-#### 1.2 Modifier
-There are 8 modifiers which has discrimination between left and right.
-
-- `KC_LCTL` and `KC_RCTL` for Control
-- `KC_LSFT` and `KC_RSFT` for Shift
-- `KC_LALT` and `KC_RALT` for Alt
-- `KC_LGUI` and `KC_RGUI` for Windows key or Command key in Mac
-
-#### 1.3 Mousekey
-- `KC_MS_U`, `KC_MS_D`, `KC_MS_L`, `KC_MS_R` for mouse cursor
-- `KC_WH_U`, `KC_WH_D`, `KC_WH_L`, `KC_WH_R` for mouse wheel
-- `KC_BTN1`, `KC_BTN2`, `KC_BTN3`, `KC_BTN4`, `KC_BTN5` for mouse buttons
-
-#### 1.4 System & Media key
-- `KC_PWR`, `KC_SLEP`, `KC_WAKE` for Power, Sleep, Wake
-- `KC_MUTE`, `KC_VOLU`, `KC_VOLD` for audio volume control
-- `KC_MNXT`, `KC_MPRV`, `KC_MSTP`, `KC_MPLY`, `KC_MSEL` for media control
-- `KC_MAIL`, `KC_CALC`, `KC_MYCM` for application launch
-- `KC_WSCH`, `KC_WHOM`, `KC_WBAK`, `KC_WFWD`, `KC_WSTP`, `KC_WREF`, `KC_WFAV` for web browser operation
-
-#### 1.5 Fn key
-`KC_FNnn` are `Fn` keys which not given any action at the beginning unlike most of keycodes has its own action. To use these keys in `KEYMAP` you need to assign action you want at first. Action of `Fn` is defined in `fn_actions[]` and index of the array is identical with number part of `KC_FNnn`. Thus `KC_FN0` designates action defined in first element of the array. ***32 `Fn` keys can be defined at most.***
-
-#### Keycode Table
- See [keycode table](doc/keycode.txt) in `doc/keycode.txt` or `common/keycode.h` for the detail or other keycodes.
+* `layer_on(<n>);`
- In regard to implementation side most of keycodes are identical with [HID usage] sent to host for real and some virtual keycodes are defined to support special actions.
-[HID usage]: http://www.usb.org/developers/devclass_docs/Hut1_11.pdf
+This will turn on the layer `<n>` - the higher layer number will always take priority. Make sure you have `KC_TRNS` for the key you're pressing on the layer you're switching to, or you'll get stick there unless you have another plan.
+* `layer_off(<n>);`
+This will turn off the layer `<n>`.
-### 2. Action
-See `common/action.h`. Action is a 16bit code and defines function to perform on events of a key like press, release, hold and tap. You can define various actions to use various action codes.
+* `clear_keyboard();`
-Most of keys just register 8bit keycodes(HID usage) to host, while to support other complex features needs 16bit extended action codes internally. But using 16bit action codes in keymap results in double size in memory against keycodes. To avoid this waste 8bit keycodes are used in `KEYMAP` to define instead of action codes.
+This will clear all mods and keys currently pressed.
-You can just use keycodes of `Normal key`, `Modifier`, `Mousekey` and `System & Media key` in keymap to indicate corresponding actions, instead of action code itself. In the end you can map most of keys just with 8bit keycodes.
+* `clear_mods();`
-To use other special actions you should use `Fn key` keycode defined with such action yourself.
+This will clear all mods currently pressed.
+* `clear_keyboard_but_mods();`
-#### 2.1 Key action
-Key is simple action that registers keycode on press event of key and unregister on release.
+This will clear all keys besides the mods currently pressed.
-##### 2.1.1 Normal key and Modifier
-You can define `Key` action on *'A'* key with:
+* `update_tri_layer(layer_1, layer_2, layer_3);`
- ACTION_KEY(KC_A)
- ACTION_KEY(KC_LSHIFT)
+If the user attempts to activate layer 1 AND layer 2 at the same time (for example, by hitting their respective layer keys), layer 3 will be activated. Layers 1 and 2 will _also_ be activated, for the purposes of fallbacks (so a given key will fall back from 3 to 2, to 1 -- and only then to 0).
-***** 2.1.2 Key with modifiers
- Say you want to assign a key to `Shift + 1` to get charactor *'!'* or `Alt + Tab` to switch windows.
+#### Timer functionality
- ACTION_MOD_KEY(KC_LSHIFT, KC_1)
- ACTION_MOD_KEY(KC_LALT, KC_TAB)
+It's possible to start timers and read values for time-specific events - here's an example:
-Or `Alt,Shift + Tab` can be defined.
+```c
+static uint16_t key_timer;
+key_timer = timer_read();
+if (timer_elapsed(key_timer) < 100) {
+ // do something if less than 100ms have passed
+} else {
+ // do something if 100ms or more have passed
+}
+```
- ACTION_MODS_KEY((MOD_BIT(KC_LALT) | MOD_BIT(KC_LSHIFT)), KC_TAB)
+It's best to declare the `static uint16_t key_timer;` outside of the macro block (top of file, etc).
-These actions are comprised of strokes of modifiers and a key. `Macro` action is needed if you want more complex key strokes.
+## Additional keycode aliases for software-implemented layouts (Colemak, Dvorak, etc)
-#### 2.2 Layer Actions
+Everything is assuming you're in Qwerty (in software) by default, but there is built-in support for using a Colemak or Dvorak layout by including this at the top of your keymap:
-##### 2.2.0 Return to Default Layer
-This sets `default layer` into `current layer`. With this action you can return to `default layer`.
-with clear other layers.
+ #include <keymap_extras/keymap_colemak.h>
- ACTION_DEFAULT_LAYER
+If you use Dvorak, use `keymap_dvorak.h` instead of `keymap_colemak.h` for this line. After including this line, you will get access to:
-##### 2.2.1 Keymap
-`Keymap` action validate given layer which ranges from 0 to 15.
+ * `CM_*` for all of the Colemak-equivalent characters
+ * `DV_*` for all of the Dvorak-equivalent characters
- ACTION_KEYMAP_MOMENTARY(layer)
- ACTION_KEYMAP_TOGGLE(layer)
- ACTION_KEYMAP_TAP_KEY(layer, key)
- ACTION_KEYMAP_TAP_TOGGLE(layer)
+These implementations assume you're using Colemak or Dvorak on your OS, not on your keyboard - this is referred to as a software-implemented layout. If your computer is in Qwerty and your keymap is in Colemak or Dvorak, this is referred to as a firmware-implemented layout, and you won't need these features.
-##### 2.2.2 Overlay
-`Overlay` action validate
+To give an example, if you're using software-implemented Colemak, and want to get an `F`, you would use `CM_F` - `KC_F` under these same circumstances would result in `T`.
- ACTION_KEYMAP_MOMENTARY(layer)
- ACTION_KEYMAP_TOGGLE(layer)
- ACTION_KEYMAP_TAP_KEY(layer, key)
- ACTION_KEYMAP_TAP_TOGGLE(layer)
+## Additional language support
-##### 2.2.3 Set Default layer
-These acitons change `default layer` to given layer.
+In `quantum/keymap_extras/`, you'll see various language files - these work the same way as the alternative layout ones do. Most are defined by their two letter country/language code followed by an underscore and a 4-letter abbreviation of its name. `FR_UGRV` which will result in a `ù` when using a software-implemented AZERTY layout. It's currently difficult to send such characters in just the firmware (but it's being worked on - see Unicode support).
- ACTION_SET_DEFAULT_LAYER(layer)
+## Unicode support
+You can currently send 4 hex digits with your OS-specific modifier key (RALT for OSX with the "Unicode Hex Input" layout) - this is currently limited to supporting one OS at a time, and requires a recompile for switching. 8 digit hex codes are being worked on. The keycode function is `UC(n)`, where *n* is a 4 digit hexidecimal. Enable from the Makefile.
-#### 2.3 Macro action
-***TBD***
+## Other firmware shortcut keycodes
-`Macro` action indicates complex key strokes.
-
- MACRO( MD(LSHIFT), D(D), END )
- MACRO( U(D), MU(LSHIFT), END )
- MACRO( I(255), T(H), T(E), T(L), T(L), W(255), T(O), END )
+* `RESET` - puts the MCU in DFU mode for flashing new firmware (with `make dfu`)
+* `DEBUG` - the firmware into debug mode - you'll need hid_listen to see things
+* `BL_ON` - turns the backlight on
+* `BL_OFF` - turns the backlight off
+* `BL_<n>` - sets the backlight to level *n*
+* `BL_INC` - increments the backlight level by one
+* `BL_DEC` - decrements the backlight level by one
+* `BL_TOGG` - toggles the backlight
+* `BL_STEP` - steps through the backlight levels
-##### 2.3.1 Normal mode
-- **I()** change interavl of stroke.
-- **D()** press key
-- **U()** release key
-- **T()** type key(press and release)
-- **W()** wait
-- **MD()** modifier down
-- **MU()** modifier up
-- **END** end mark
+Enable the backlight from the Makefile.
-##### 2.3.2 Extended mode
+## MIDI functionalty
-***TODO: sample impl***
-See `keyboard/hhkb/keymap.c` for sample.
+This is still a WIP, but check out `quantum/keymap_midi.c` to see what's happening. Enable from the Makefile.
+## Bluetooth functionality
-#### 2.4 Function action
-***TBD***
+This requires [some hardware changes](https://www.reddit.com/r/MechanicalKeyboards/comments/3psx0q/the_planck_keyboard_with_bluetooth_guide_and/?ref=search_posts), but can be enabled via the Makefile. The firmware will still output characters via USB, so be aware of this when charging via a computer. It would make sense to have a switch on the Bluefruit to turn it off at will.
-There are two type of action, normal `Function` and tappable `Function`.
-These actions call user defined function with `id`, `opt`, and key event information as arguments.
+## International Characters on Windows
-##### 2.4.1 Function
-To define normal `Function` action in keymap use this.
+[AutoHotkey](https://autohotkey.com) allows Windows users to create custom hotkeys among others.
- ACTION_FUNCTION(id, opt)
+The method does not require Unicode support in the keyboard itself but depends instead of AutoHotkey running in the background.
-##### 2.4.2 Function with tap
-To define tappable `Function` action in keymap use this.
+First you need to select a modifier combination that is not in use by any of your programs.
+CtrlAltWin is not used very widely and should therefore be perfect for this.
+There is a macro defined for a mod-tab combo `LCAG_T`.
+Add this mod-tab combo to a key on your keyboard, e.g.: `LCAG_T(KC_TAB)`.
+This makes the key behave like a tab key if pressed and released immediately but changes it to the modifier if used with another key.
- ACTION_FUNCTION_TAP(id, opt)
+In the default script of AutoHotkey you can define custom hotkeys.
-##### 2.4.3 Implement user function
-`Function` actions can be defined freely with C by user in callback function:
+ <^<!<#a::Send, ä
+ <^<!<#<+a::Send, Ä
- void keymap_call_function(keyrecord_t *event, uint8_t id, uint8_t opt)
+The hotkeys above are for the combination CtrlAltGui and CtrlAltGuiShift plus the letter a.
+AutoHotkey inserts the Text right of `Send, ` when this combination is pressed.
-This C function is called every time key is operated, argument `id` selects action to be performed and `opt` can be used for option. Functon `id` can be 0-255 and `opt` can be 0-15.
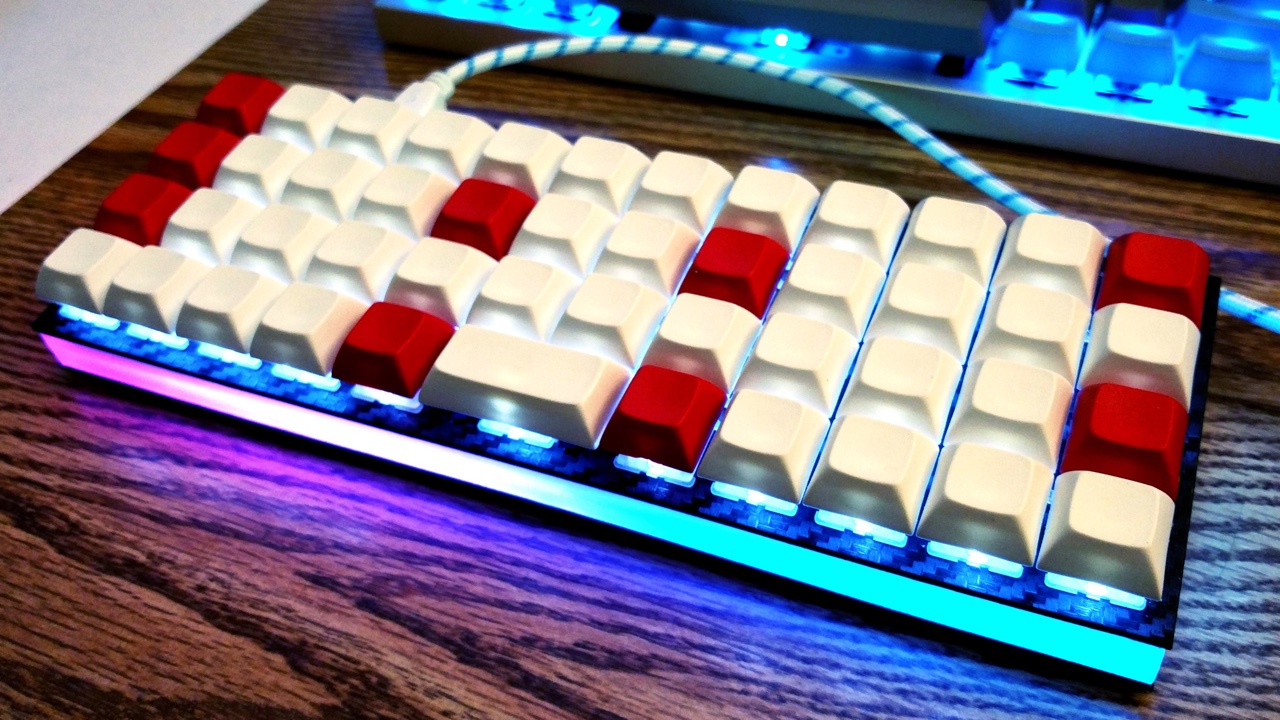
+## RGB Under Glow Mod
- `keyrecord_t` is comprised of key event and tap count. `keyevent_t` indicates which and when key is pressed or released. From `tap_count` you can know tap state, 0 means no tap. These information will be used in user function to decide how action of key is performed.
+
- typedef struct {
- keyevent_t event;
- uint8_t tap_count;
- } keyrecord_t;
+Here is a quick demo on Youtube (with NPKC KC60) (https://www.youtube.com/watch?v=VKrpPAHlisY).
- typedef struct {
- key_t key;
- bool pressed;
- uint16_t time;
- } keyevent_t;
+For this mod, you need an unused pin wiring to DI of WS2812 strip. After wiring the VCC, GND, and DI, you can enable the underglow in your Makefile.
- typedef struct {
- uint8_t col;
- uint8_t row;
- } key_t;
+ RGBLIGHT_ENABLE = yes
-***TODO: sample impl***
-See `keyboard/hhkb/keymap.c` for sample.
+Please note that the underglow is not compatible with audio output. So you cannot enable both of them at the same time.
+Please add the following options into your config.h, and set them up according your hardware configuration. These settings are for the F4 by default:
+ #define ws2812_PORTREG PORTF
+ #define ws2812_DDRREG DDRF
+ #define ws2812_pin PF4
+ #define RGBLED_NUM 14 // Number of LEDs
+ #define RGBLIGHT_HUE_STEP 10
+ #define RGBLIGHT_SAT_STEP 17
+ #define RGBLIGHT_VAL_STEP 17
+You'll need to edit `PORTF`, `DDRF`, and `PF4` on the first three lines to the port/pin you have your LED(s) wired to, eg for B3 change things to:
+ #define ws2812_PORTREG PORTB
+ #define ws2812_DDRREG DDRB
+ #define ws2812_pin PB3
-### 3. Layer
- Layer is key-action map to assign action to every physical key. You can define multiple layers in keymap and make layers active out of keymap during operation at will.
+The firmware supports 5 different light effects, and the color (hue, saturation, brightness) can be customized in most effects. To control the underglow, you need to modify your keymap file to assign those functions to some keys/key combinations. For details, please check this keymap. `keyboard/planck/keymaps/yang/keymap.c`
- First layer is indexed by `0` which usually become **`default layer`** and active in initial state.
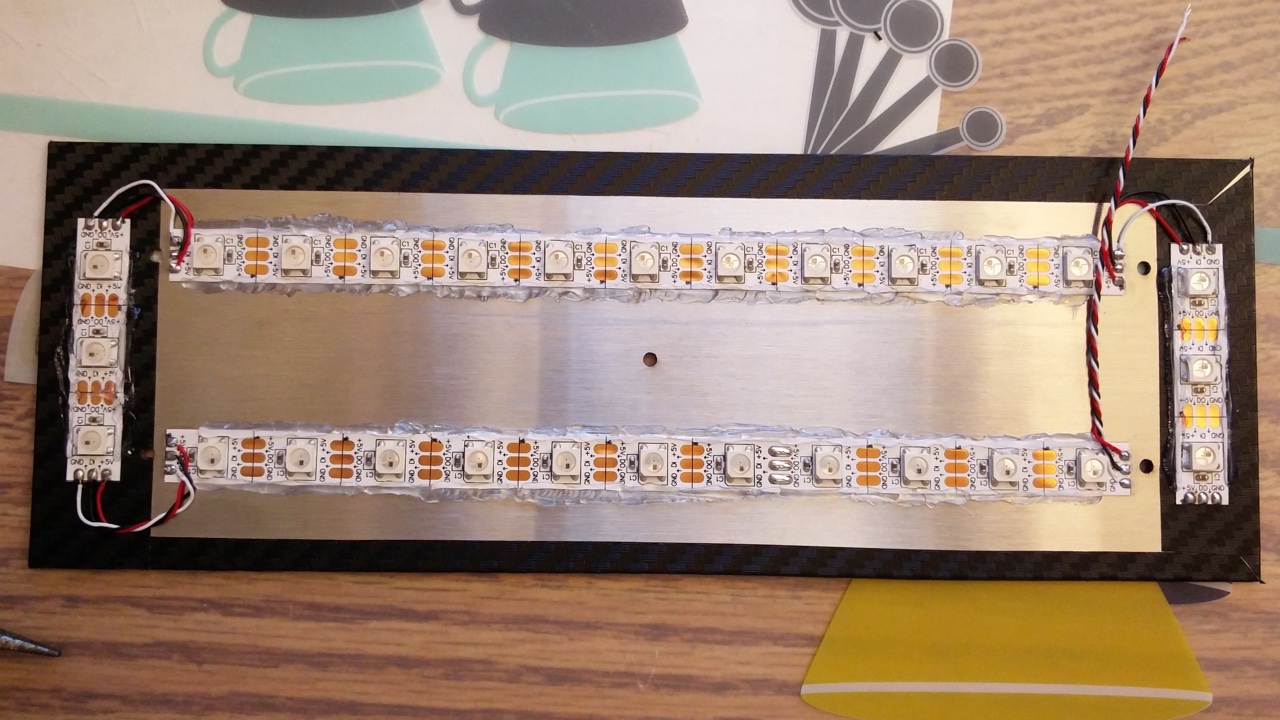
+### WS2812 Wiring
-You can define **16 layers** at most in each keymaps[] and overlays[].
+
- you can define a layer with placing keycode symbols separated with `comma` in `KEYMAP`, which is formed with resemblance to physical keyboard layout so as you can easily put keycode on place you want to map. ***You can define most of keys with just using keycodes*** except for `Fn` key serving special actions.
+Please note the USB port can only supply a limited amount of power to the keyboard (500mA by standard, however, modern computer and most usb hubs can provide 700+mA.). According to the data of NeoPixel from Adafruit, 30 WS2812 LEDs require a 5V 1A power supply, LEDs used in this mod should not more than 20.
+## Safety Considerations
+You probably don't want to "brick" your keyboard, making it impossible
+to rewrite firmware onto it. Here are some of the parameters to show
+what things are (and likely aren't) too risky.
-### 4. Layer switching
-You can have some ways to switch layer with these actions.
-There are two kind of layer switch action `Layer Set` and `Layer Bit` and two type of switching behaviour **Momentary** and **Toggle**.
-
-#### 4.1 Momentary switching
-Momentary switching changes layer only while holding Fn key.
-
-##### 4.1.1 Momentary Set
-This action makes `Layer 1` active on key press event and inactive on release event..
-
- ACTION_KEYMAP_MOMENTARY(1)
-
-
-It switches to destination layer immediately when key is pressed, after that actions on keymap of destination layer is perfomed. ***Thus you shall need to place action to come back on destination layer***, or you will be stuck in destination layer without way to get back. To get back to `default layer` you can use this action.
-
- ACTION_LAYER_DEFAULT
-
-##### 4.1.2 Momentary Bit
-This `Layer Bit` action performs XOR `1` with `current layer` on both press and release event. If you are on `Layer 0` now next layer to switch will be `Layer 1`. To come back to previous layer you need to place same action on destination layer.
-
- ACTION_LAYER_BIT(1)
-
-#### 4.2 Toggle switching
-Toggle switching changes layer after press then release. You keep being on the layer until you press key to return.
-
-##### 4.2.1 Toggle Set
-This `Layer Set Toggle` action is to set `Layer 1` to `current layer` on release and do none on press.
-
- ACTION_LAYER_SET_TOGGLE(1)
-
-To get back to `default layer` you can use this action.
-
- ACTION_LAYER_DEFAULT
-
-##### 4.2.2 Toggle Bit
-This `Layer Bit Toggle` action is to XOR `1` with `current layer` on release and do none on press. If you are on `Layer 2` you'll switch to `Layer 3` on press. To come back to previous layer you need to place same action on destination layer.
-
- ACTION_LAYER_BIT_TOGGLE(1)
-
-
-#### 4.3 Momentary switching with Tap key
-These actions switch to layer only while holding `Fn` key and register key on tap. **Tap** means to press and release key quickly.
-
- ACTION_LAYER_SET_TAP_KEY(2, KC_SCLN)
- ACTION_LAYER_SET_BIT_KEY(2, KC_SCLN)
-
-With these you can place layer switching function on normal alphabet key like `;` without losing its original register function.
-
-#### 4.4 Momentary switching with Tap Toggle
-This changes layer only while holding `Fn` key and toggle layer after several taps. **Tap** means to press and release key quickly.
-
- ACTION_LAYER_SET_TAP_TOGGLE(layer)
- ACTION_LAYER_BIT_TAP_TOGGLE(layer)
-
-Number of taps can be defined with `TAPPING_TOGGLE` in `config.h`, `5` by default.
-
-
-
-
-Legacy Keymap
--------------
-This was used in prior version and still works due to legacy support code in `common/keymap.c`. Legacy keymap doesn't support many of features that new keymap offers.
-
-In comparison with new keymap how to define Fn key is different. It uses two arrays `fn_layer[]` and `fn_keycode[]`. The index of arrays corresponds with postfix number of `Fn` key. Array `fn_layer[]` indicates destination layer to switch and `fn_keycode[]` has keycodes to send when tapping `Fn` key.
-
-In following setting example, `Fn0`, `Fn1` and `Fn2` switch layer to 1, 2 and 2 respectively. `Fn2` registers `Space` key when tap while `Fn0` and `Fn1` doesn't send any key.
-
- static const uint8_t PROGMEM fn_layer[] = {
- 1, // Fn0
- 2, // Fn1
- 2, // Fn2
- };
-
- static const uint8_t PROGMEM fn_keycode[] = {
- KC_NO, // Fn0
- KC_NO, // Fn1
- KC_SPC, // Fn2
- };
-
-
-
-Debuging
---------
-Use PJRC's `hid_listen` to see debug messages. You can use the tool for debug even if firmware use LUFA stack.
-
-You will see output from firmware like this.
-
- r/c 01234567
- 00: 00000000
- 01: 00000000
- 02: 00000000
- 03: 00000000
- 04: 00000000
- 05: 00000000
- 06: 00000000
- 07: 00000000
-
- ---- action_exec: start -----
- EVENT: 0307u(22511)
- Tapping: Tap release(2)
- ACTION: ACT_LAYER[5:2C]
- LAYER_PRESSED: Tap: unregister_code
- TAPPING_KEY=0307u(22511):2
- processed: 0307u(22511):2
-
- Tapping: End(Timeout after releasing last tap): FFFFu(22715)
- TAPPING_KEY=0000u(0):0
-
-
-
-
-Magic Comannds
---------------
-To see help press `Magic` + `H`.
-
- `Magic` key bind may be `LShift` + `RShift` in many project, but `Power` key on ADB converter. `Magic` keybind can be vary on each project, check `config.h` in project directory.
-
-Following commands can be also executed with `Magic` + key. In console mode `Magic` keybind is not needed.
-
- ----- Command Help -----
- c: enter console mode
- d: toggle debug enable
- x: toggle matrix debug
- k: toggle keyboard debug
- m: toggle mouse debug
- p: toggle print enable
- v: print device version & info
- t: print timer count
- s: print status
- 0/F10: switch to Layer0
- 1/F1: switch to Layer1
- 2/F2: switch to Layer2
- 3/F3: switch to Layer3
- 4/F4: switch to Layer4
- PScr: power down/remote wake-up
- Caps: Lock Keyboard(Child Proof)
- Paus: jump to bootloader
-
-### Boot Magic
-Magic commands are executed when boot time. Press `Magic` command key then pulgin.
-
-Define these macros in config.h.
-
- IS_BOOTMAGIC_DEBUG
- IS_BOOTMAGIC_BOOTLOADER
-
-***TODO: sample impl***
-See `keyboard/hhkb/config.h` for sample.
-
-
-
-Start Your Own Project
------------------------
-
-
-
-Files & Directories
--------------------
-### Top
-* common/ - common codes
-* protocol/ - keyboard protocol support
-* keyboard/ - keyboard projects
-* converter/ - protocol converter projects
-* doc/ - documents
-* common.mk - Makefile for common
-* protoco.mk - Makefile for protocol
-* rules.mk - Makefile for build rules
-
-### Common
-* action.[ch]
-* action_macro.[ch]
-* bootloader.[ch]
-* command.[ch]
-* controller_teensy.h
-* debug.[ch]
-* host.[ch]
-* host_driver.h
-* keyboard.[ch]
-* keycode.h
-* keymap.[ch]
-* led.h
-* matrix.h
-* mousekey.[ch]
-* print.[ch]
-* report.h
-* sendchar.h
-* sendchar_null.c
-* sendchar_uart.c
-* timer.[ch]
-* uart.[ch]
-* util.[ch]
-
-### Keyboard Protocols
-* lufa/ - LUFA USB stack
-* pjrc/ - PJRC USB stack
-* vusb/ - Objective Development V-USB
-* iwrap/ - Bluetooth HID for Bluegiga iWRAP
-* ps2.c - PS/2 protocol
-* adb.c - Apple Desktop Bus protocol
-* m0110.c - Macintosh 128K/512K/Plus keyboard protocol
-* news.c - Sony NEWS keyboard protocol
-* x68k.c - Sharp X68000 keyboard protocol
-* serial_soft.c - Asynchronous Serial protocol implemented by software
-
-
-
-License
--------
-Under `GPL` 2 or later. Some protocol files are under `Modified BSD License`.
-LUFA, PJRC and V-USB stack have their own license respectively.
+- If a keyboard map does not include RESET, then, to get into DFU
+ mode, you will need to press the reset button on the PCB, which
+ requires unscrewing some bits.
+- Messing with tmk_core / common files might make the keyboard
+ inoperable
+- Too large a .hex file is trouble; `make dfu` will erase the block,
+ test the size (oops, wrong order!), which errors out, failing to
+ flash the keyboard
+- DFU tools do /not/ allow you to write into the bootloader (unless
+ you throw in extra fruitsalad of options), so there is little risk
+ there.
+- EEPROM has around a 100000 write cycle. You shouldn't rewrite the
+ firmware repeatedly and continually; that'll burn the EEPROM
+ eventually.
+