1 # Quantum Mechanical Keyboard Firmware
3 This is a keyboard firmware based on the [tmk_keyboard firmware](http://github.com/tmk/tmk_keyboard) with some useful features for Atmel AVR controllers, and more specifically, the [OLKB product line](http://olkb.co), the [ErgoDox EZ](http://www.ergodox-ez.com) keyboard, and the [Clueboard product line](http://clueboard.co/).
5 QMK is developed and maintained by Jack Humbert of OLKB with contributions from the community, and of course, TMK.
7 This documentation is edited and maintained by Erez Zukerman of ErgoDox EZ. If you spot any typos or inaccuracies, please [open an issue](https://github.com/jackhumbert/qmk_firmware/issues/new).
9 The OLKB product firmwares are maintained by Jack, the Ergodox EZ by Erez, and the Clueboard by [Zach White](https://github.com/skullydazed).
11 ## Important background info: TMK documentation
13 The documentation below explains QMK customizations and elaborates on some of the more useful features of TMK. To understand the base firmware, and especially what *layers* are and how they work, please see [TMK_README.md](/TMK_README.md).
17 * [BUILD_GUIDE.md](BUILD_GUIDE.md) contains instructions to set up a build environment, build the firmware, and deploy it to a keyboard. Once your build environment has been set up, all `make` commands to actually build the firmware must be run from a folder in `keyboard/`.
18 * If you're looking to customize a keyboard that currently runs QMK or TMK, find your keyboard's directory under `keyboard/` and run the make commands from there.
19 * If you're looking to apply this firmware to an entirely new hardware project (a new kind of keyboard), you can create your own Quantum-based project by using `./new_project.sh <project_name>`, which will create `/keyboard/<project_name>` with all the necessary components for a Quantum project.
23 You have access to a bunch of goodies! Check out the Makefile to enable/disable some of the features. Uncomment the `#` to enable them. Setting them to `no` does nothing and will only confuse future you.
25 BACKLIGHT_ENABLE = yes # Enable keyboard backlight functionality
26 MIDI_ENABLE = yes # MIDI controls
27 UNICODE_ENABLE = no # <-- This is how you disable an option, just set it to "no"
28 BLUETOOTH_ENABLE = yes # Enable Bluetooth with the Adafruit EZ-Key HID
30 ### Customizing Makefile options on a per-keymap basis
32 If your keymap directory has a file called `makefile.mk` (note the lowercase filename, and the `.mk` extension), any Makefile options you set in that file will take precedence over other Makefile options (those set for Quantum as a whole or for your particular keyboard).
34 So let's say your keyboard's makefile has `CONSOLE_ENABLE = yes` (or maybe doesn't even list the `CONSOLE_ENABLE` option, which would cause it to revert to the global Quantum default). You want your particular keymap to not have the debug console, so you make a file called `makefile.mk` and specify `CONSOLE_ENABLE = no`.
36 ### Customizing config.h on a per-keymap basis
38 If you use the ErgoDox EZ, you can make a `config_user.h` file in your keymap directory and use it to override any `config.h` settings you don't like. Anything you set there will take precedence over the global `config.h` for the ErgoDox EZ. To see an example of this, check out `keymaps/erez_experimental`.
40 ## Quick aliases to common actions
42 Your keymap can include shortcuts to common operations (called "function actions" in tmk).
44 ### Switching and toggling layers
46 `MO(layer)` - momentary switch to *layer*. As soon as you let go of the key, the layer is deactivated and you pop back out to the previous layer. When you apply this to a key, that same key must be set as `KC_TRNS` on the destination layer. Otherwise, you won't make it back to the original layer when you release the key (and you'll get a keycode sent). You can only switch to layers *above* your current layer. If you're on layer 0 and you use `MO(1)`, that will switch to layer 1 just fine. But if you include `MO(3)` on layer 5, that won't do anything for you -- because layer 3 is lower than layer 5 on the stack.
48 `OSL(layer)` - momentary switch to *layer*, as a one-shot operation. So if you have a key that's defined as `OSL(1)`, and you tap that key, then only the very next keystroke would come from layer 1. You would drop back to layer zero immediately after that one keystroke. That's handy if you have a layer full of custom shortcuts -- for example, a dedicated key for closing a window. So you tap your one-shot layer mod, then tap that magic 'close window' key, and keep typing like a boss. Layer 1 would remain active as long as you hold that key down, too (so you can use it like a momentary toggle-layer key with extra powers).
50 `LT(layer, kc)` - momentary switch to *layer* when held, and *kc* when tapped. Like `MO()`, this only works upwards in the layer stack (`layer` must be higher than the current layer).
52 `TG(layer)` - toggles a layer on or off. As with `MO()`, you should set this key as `KC_TRNS` in the destination layer so that tapping it again actually toggles back to the original layer. Only works upwards in the layer stack.
55 ### Fun with modifier keys
57 * `LSFT(kc)` - applies left Shift to *kc* (keycode) - `S(kc)` is an alias
58 * `RSFT(kc)` - applies right Shift to *kc*
59 * `LCTL(kc)` - applies left Control to *kc*
60 * `RCTL(kc)` - applies right Control to *kc*
61 * `LALT(kc)` - applies left Alt to *kc*
62 * `RALT(kc)` - applies right Alt to *kc*
63 * `LGUI(kc)` - applies left GUI (command/win) to *kc*
64 * `RGUI(kc)` - applies right GUI (command/win) to *kc*
65 * `HYPR(kc)` - applies Hyper (all modifiers) to *kc*
66 * `MEH(kc)` - applies Meh (all modifiers except Win/Cmd) to *kc*
67 * `LCAG(kc)` - applies CtrlAltGui to *kc*
69 You can also chain these, like this:
71 LALT(LCTL(KC_DEL)) -- this makes a key that sends Alt, Control, and Delete in a single keypress.
73 The following shortcuts automatically add `LSFT()` to keycodes to get commonly used symbols. Their long names are also available and documented in `/quantum/keymap_common.h`.
93 `OSM(mod)` - this is a "one shot" modifier. So let's say you have your left Shift key defined as `OSM(MOD_LSFT)`. Tap it, let go, and Shift is "on" -- but only for the next character you'll type. So to write "The", you don't need to hold down Shift -- you tap it, tap t, and move on with life. And if you hold down the left Shift key, it just works as a left Shift key, as you would expect (so you could type THE). There's also a magical, secret way to "lock" a modifier by tapping it multiple times. If you want to learn more about that, open an issue. :)
95 `MT(mod, kc)` - is *mod* (modifier key - MOD_LCTL, MOD_LSFT) when held, and *kc* when tapped. In other words, you can have a key that sends Esc (or the letter O or whatever) when you tap it, but works as a Control key or a Shift key when you hold it down.
97 These are the values you can use for the `mod` in `MT()` and `OSM()` (right-hand modifiers are not available for `MT()`):
107 These can also be combined like `MOD_LCTL | MOD_LSFT` e.g. `MT(MOD_LCTL | MOD_LSFT, KC_ESC)` which would activate Control and Shift when held, and send Escape when tapped.
109 We've added shortcuts to make common modifier/tap (mod-tap) mappings more compact:
111 * `CTL_T(kc)` - is LCTL when held and *kc* when tapped
112 * `SFT_T(kc)` - is LSFT when held and *kc* when tapped
113 * `ALT_T(kc)` - is LALT when held and *kc* when tapped
114 * `GUI_T(kc)` - is LGUI when held and *kc* when tapped
115 * `ALL_T(kc)` - is Hyper (all mods) when held and *kc* when tapped. To read more about what you can do with a Hyper key, see [this blog post by Brett Terpstra](http://brettterpstra.com/2012/12/08/a-useful-caps-lock-key/)
116 * `LCAG_T(kc)` - is CtrlAltGui when held and *kc* when tapped
117 * `MEH_T(kc)` - is like Hyper, but not as cool -- does not include the Cmd/Win key, so just sends Alt+Ctrl+Shift.
119 ### Temporarily setting the default layer
121 `DF(layer)` - sets default layer to *layer*. The default layer is the one at the "bottom" of the layer stack - the ultimate fallback layer. This currently does not persist over power loss. When you plug the keyboard back in, layer 0 will always be the default. It is theoretically possible to work around that, but that's not what `DF` does.
123 ### Prevent stuck modifiers
125 Consider the following scenario:
127 1. Layer 0 has a key defined as Shift.
128 2. The same key is defined on layer 1 as the letter A.
129 3. User presses Shift.
130 4. User switches to layer 1 for whatever reason.
131 5. User releases Shift, or rather the letter A.
132 6. User switches back to layer 0.
134 Shift was actually never released and is still considered pressed.
136 If such situation bothers you add this to your `config.h`:
138 #define PREVENT_STUCK_MODIFIERS
140 This option uses 5 bytes of memory per every 8 keys on the keyboard
141 rounded up (5 bits per key). For example on Planck (48 keys) it uses
142 (48/8)\*5 = 30 bytes.
144 ### Remember: These are just aliases
146 These functions work the same way that their `ACTION_*` functions do - they're just quick aliases. To dig into all of the tmk ACTION_* functions, please see the [TMK documentation](https://github.com/jackhumbert/qmk_firmware/blob/master/tmk_core/doc/keymap.md#2-action).
148 Instead of using `FNx` when defining `ACTION_*` functions, you can use `F(x)` - the benefit here is being able to use more than 32 function actions (up to 4096), if you happen to need them.
150 ## Macro shortcuts: Send a whole string when pressing just one key
152 Instead of using the `ACTION_MACRO` function, you can simply use `M(n)` to access macro *n* - *n* will get passed into the `action_get_macro` as the `id`, and you can use a switch statement to trigger it. This gets called on the keydown and keyup, so you'll need to use an if statement testing `record->event.pressed` (see keymap_default.c).
155 const macro_t *action_get_macro(keyrecord_t *record, uint8_t id, uint8_t opt) // this is the function signature -- just copy/paste it into your keymap file as it is.
158 case 0: // this would trigger when you hit a key mapped as M(0)
159 if (record->event.pressed) {
160 return MACRO( I(255), T(H), T(E), T(L), T(L), W(255), T(O), END ); // this sends the string 'hello' when the macro executes
167 A macro can include the following commands:
169 * I() change interval of stroke in milliseconds.
172 * T() type key(press and release).
173 * W() wait (milliseconds).
176 So above you can see the stroke interval changed to 255ms between each keystroke, then a bunch of keys being typed, waits a while, then the macro ends.
178 Note: Using macros to have your keyboard send passwords for you is possible, but a bad idea.
180 ### Advanced macro functions
182 To get more control over the keys/actions your keyboard takes, the following functions are available to you in the `action_get_macro` function block:
184 * `record->event.pressed`
186 This is a boolean value that can be tested to see if the switch is being pressed or released. An example of this is
189 if (record->event.pressed) {
196 * `register_code(<kc>);`
198 This sends the `<kc>` keydown event to the computer. Some examples would be `KC_ESC`, `KC_C`, `KC_4`, and even modifiers such as `KC_LSFT` and `KC_LGUI`.
200 * `unregister_code(<kc>);`
202 Parallel to `register_code` function, this sends the `<kc>` keyup event to the computer. If you don't use this, the key will be held down until it's sent.
206 This will turn on the layer `<n>` - the higher layer number will always take priority. Make sure you have `KC_TRNS` for the key you're pressing on the layer you're switching to, or you'll get stick there unless you have another plan.
210 This will turn off the layer `<n>`.
212 * `clear_keyboard();`
214 This will clear all mods and keys currently pressed.
218 This will clear all mods currently pressed.
220 * `clear_keyboard_but_mods();`
222 This will clear all keys besides the mods currently pressed.
224 * `update_tri_layer(layer_1, layer_2, layer_3);`
226 If the user attempts to activate layer 1 AND layer 2 at the same time (for example, by hitting their respective layer keys), layer 3 will be activated. Layers 1 and 2 will _also_ be activated, for the purposes of fallbacks (so a given key will fall back from 3 to 2, to 1 -- and only then to 0).
228 #### Naming your macros
230 If you have a bunch of macros you want to refer to from your keymap, while keeping the keymap easily readable, you can just name them like so:
240 #define EXT_PLV M(13)
243 As was done on the [Planck default keymap](/keyboard/planck/keymaps/default/keymap.c#L33-L40)
245 #### Timer functionality
247 It's possible to start timers and read values for time-specific events - here's an example:
250 static uint16_t key_timer;
251 key_timer = timer_read();
252 if (timer_elapsed(key_timer) < 100) {
253 // do something if less than 100ms have passed
255 // do something if 100ms or more have passed
259 It's best to declare the `static uint16_t key_timer;` outside of the macro block (top of file, etc).
261 #### Example 1: Single-key copy/paste (hold to copy, tap to paste)
263 With QMK, it's easy to make one key do two things, as long as one of those things is being a modifier. :) So if you want a key to act as Ctrl when held and send the letter R when tapped, that's easy: `CTL_T(KC_R)`. But what do you do when you want that key to send Ctrl-V (paste) when tapped, and Ctrl-C (copy) when held?
269 static uint16_t key_timer;
271 const macro_t *action_get_macro(keyrecord_t *record, uint8_t id, uint8_t opt)
275 if (record->event.pressed) {
276 key_timer = timer_read(); // if the key is being pressed, we start the timer.
278 else { // this means the key was just released, so we can figure out how long it was pressed for (tap or "held down").
279 if (timer_elapsed(key_timer) > 150) { // 150 being 150ms, the threshhold we pick for counting something as a tap.
280 return MACRO( D(LCTL), T(C), U(LCTL), END );
283 return MACRO( D(LCTL), T(V), U(LCTL), END );
293 And then, to assign this macro to a key on your keyboard layout, you just use `M(0)` on the key you want to press for copy/paste.
295 #### Example 2: Space Cadet Shift (making it easy to send opening and closing parentheses)
297 In the [Modern Space Cadet Keyboard](http://stevelosh.com/blog/2012/10/a-modern-space-cadet/#shift-parentheses), one of cooler features is the Shift Parentheses. To quote Steve Losh:
299 > When held while pressing other keys, act like Shift.
300 > When pressed and released on their own, type an opening or closing parenthesis (left and right shift respectively).
303 static uint16_t key_timer;
305 const macro_t *action_get_macro(keyrecord_t *record, uint8_t id, uint8_t opt)
309 if (record->event.pressed) {
310 key_timer = timer_read(); // if the key is being pressed, we start the timer.
311 register_code(KC_LSFT); // we're now holding down Shift.
312 } else { // this means the key was just released, so we can figure out how long it was pressed for (tap or "held down").
313 if (timer_elapsed(key_timer) < 150) { // 150 being 150ms, the threshhold we pick for counting something as a tap.
314 register_code(KC_9); // sending 9 while Shift is held down gives us an opening paren
315 unregister_code(KC_9); // now let's let go of that key
317 unregister_code(KC_LSFT); // let's release the Shift key now.
322 if (record->event.pressed) {
323 key_timer = timer_read(); // Now we're doing the same thing, only for the right shift/close paren key
324 register_code(KC_RSFT);
326 if (timer_elapsed(key_timer) < 150) {
328 unregister_code(KC_0);
330 unregister_code(KC_RSFT);
339 And then, to assign this macro to a key on your keyboard layout, you just use `M(0)` on the key you want to press for left shift/opening parens, and `M(1)` for right shift/closing parens.
341 ## Additional keycode aliases for software-implemented layouts (Colemak, Dvorak, etc)
343 Everything is assuming you're in Qwerty (in software) by default, but there is built-in support for using a Colemak or Dvorak layout by including this at the top of your keymap:
345 #include <keymap_colemak.h>
347 If you use Dvorak, use `keymap_dvorak.h` instead of `keymap_colemak.h` for this line. After including this line, you will get access to:
349 * `CM_*` for all of the Colemak-equivalent characters
350 * `DV_*` for all of the Dvorak-equivalent characters
352 These implementations assume you're using Colemak or Dvorak on your OS, not on your keyboard - this is referred to as a software-implemented layout. If your computer is in Qwerty and your keymap is in Colemak or Dvorak, this is referred to as a firmware-implemented layout, and you won't need these features.
354 To give an example, if you're using software-implemented Colemak, and want to get an `F`, you would use `CM_F` - `KC_F` under these same circumstances would result in `T`.
356 ## Additional language support
358 In `quantum/keymap_extras/`, you'll see various language files - these work the same way as the alternative layout ones do. Most are defined by their two letter country/language code followed by an underscore and a 4-letter abbreviation of its name. `FR_UGRV` which will result in a `ù` when using a software-implemented AZERTY layout. It's currently difficult to send such characters in just the firmware (but it's being worked on - see Unicode support).
362 You can currently send 4 hex digits with your OS-specific modifier key (RALT for OSX with the "Unicode Hex Input" layout) - this is currently limited to supporting one OS at a time, and requires a recompile for switching. 8 digit hex codes are being worked on. The keycode function is `UC(n)`, where *n* is a 4 digit hexidecimal. Enable from the Makefile.
364 ## Other firmware shortcut keycodes
366 * `RESET` - puts the MCU in DFU mode for flashing new firmware (with `make dfu`)
367 * `DEBUG` - the firmware into debug mode - you'll need hid_listen to see things
368 * `BL_ON` - turns the backlight on
369 * `BL_OFF` - turns the backlight off
370 * `BL_<n>` - sets the backlight to level *n*
371 * `BL_INC` - increments the backlight level by one
372 * `BL_DEC` - decrements the backlight level by one
373 * `BL_TOGG` - toggles the backlight
374 * `BL_STEP` - steps through the backlight levels
376 Enable the backlight from the Makefile.
380 This is still a WIP, but check out `quantum/keymap_midi.c` to see what's happening. Enable from the Makefile.
382 ## Bluetooth functionality
384 This requires [some hardware changes](https://www.reddit.com/r/MechanicalKeyboards/comments/3psx0q/the_planck_keyboard_with_bluetooth_guide_and/?ref=search_posts), but can be enabled via the Makefile. The firmware will still output characters via USB, so be aware of this when charging via a computer. It would make sense to have a switch on the Bluefruit to turn it off at will.
386 ## International Characters on Windows
388 [AutoHotkey](https://autohotkey.com) allows Windows users to create custom hotkeys among others.
390 The method does not require Unicode support in the keyboard itself but depends instead of AutoHotkey running in the background.
392 First you need to select a modifier combination that is not in use by any of your programs.
393 CtrlAltWin is not used very widely and should therefore be perfect for this.
394 There is a macro defined for a mod-tab combo `LCAG_T`.
395 Add this mod-tab combo to a key on your keyboard, e.g.: `LCAG_T(KC_TAB)`.
396 This makes the key behave like a tab key if pressed and released immediately but changes it to the modifier if used with another key.
398 In the default script of AutoHotkey you can define custom hotkeys.
403 The hotkeys above are for the combination CtrlAltGui and CtrlAltGuiShift plus the letter a.
404 AutoHotkey inserts the Text right of `Send, ` when this combination is pressed.
406 ## RGB Under Glow Mod
408 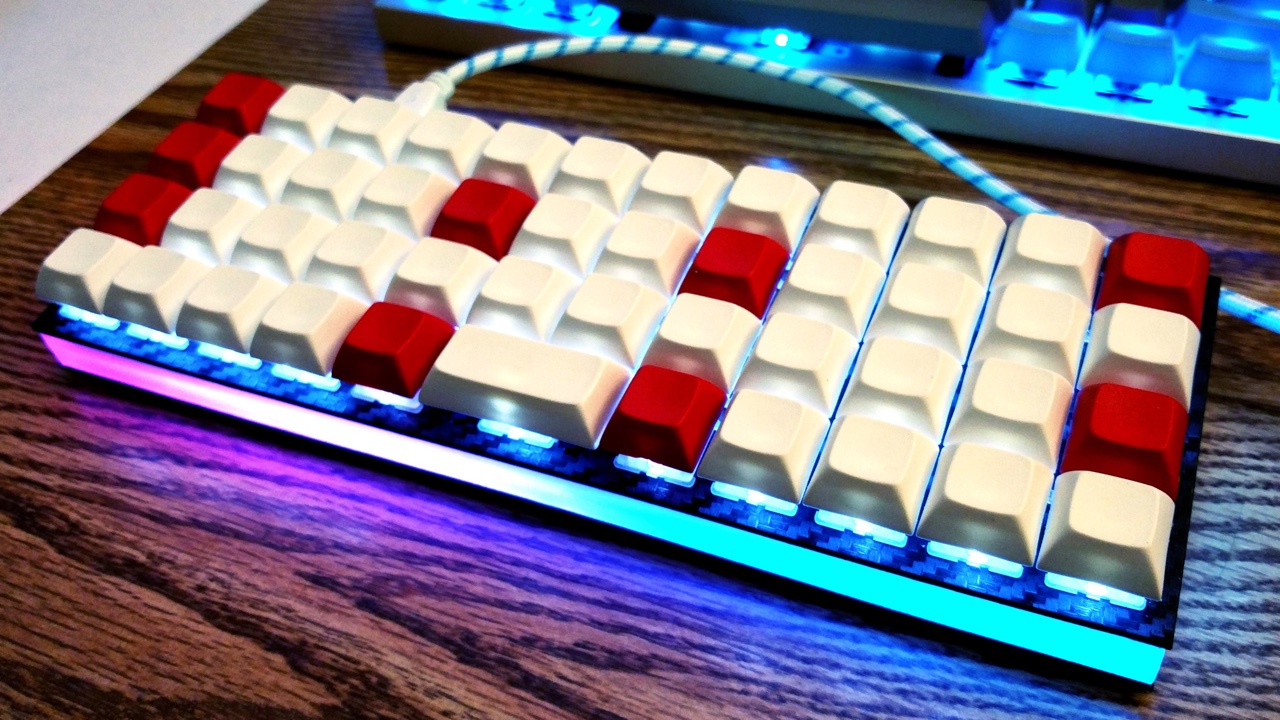
410 Here is a quick demo on Youtube (with NPKC KC60) (https://www.youtube.com/watch?v=VKrpPAHlisY).
412 For this mod, you need an unused pin wiring to DI of WS2812 strip. After wiring the VCC, GND, and DI, you can enable the underglow in your Makefile.
414 RGBLIGHT_ENABLE = yes
416 Please note that the underglow is not compatible with audio output. So you cannot enable both of them at the same time.
418 Please add the following options into your config.h, and set them up according your hardware configuration. These settings are for the F4 by default:
420 #define ws2812_PORTREG PORTF
421 #define ws2812_DDRREG DDRF
422 #define ws2812_pin PF4
423 #define RGBLED_NUM 14 // Number of LEDs
424 #define RGBLIGHT_HUE_STEP 10
425 #define RGBLIGHT_SAT_STEP 17
426 #define RGBLIGHT_VAL_STEP 17
428 You'll need to edit `PORTF`, `DDRF`, and `PF4` on the first three lines to the port/pin you have your LED(s) wired to, eg for B3 change things to:
430 #define ws2812_PORTREG PORTB
431 #define ws2812_DDRREG DDRB
432 #define ws2812_pin PB3
434 The firmware supports 5 different light effects, and the color (hue, saturation, brightness) can be customized in most effects. To control the underglow, you need to modify your keymap file to assign those functions to some keys/key combinations. For details, please check this keymap. `keyboard/planck/keymaps/yang/keymap.c`
438 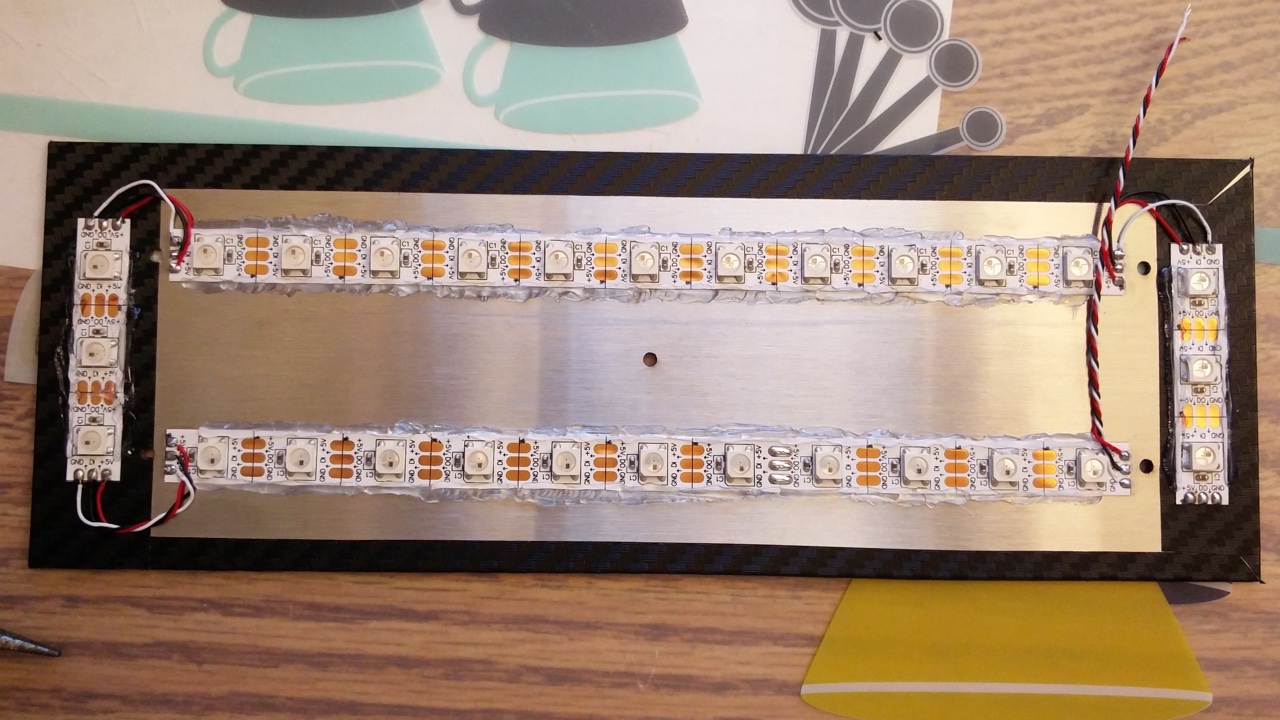
440 Please note the USB port can only supply a limited amount of power to the keyboard (500mA by standard, however, modern computer and most usb hubs can provide 700+mA.). According to the data of NeoPixel from Adafruit, 30 WS2812 LEDs require a 5V 1A power supply, LEDs used in this mod should not more than 20.
442 ## Safety Considerations
444 You probably don't want to "brick" your keyboard, making it impossible
445 to rewrite firmware onto it. Here are some of the parameters to show
446 what things are (and likely aren't) too risky.
448 - If a keyboard map does not include RESET, then, to get into DFU
449 mode, you will need to press the reset button on the PCB, which
450 requires unscrewing some bits.
451 - Messing with tmk_core / common files might make the keyboard
453 - Too large a .hex file is trouble; `make dfu` will erase the block,
454 test the size (oops, wrong order!), which errors out, failing to
456 - DFU tools do /not/ allow you to write into the bootloader (unless
457 you throw in extra fruitsalad of options), so there is little risk
459 - EEPROM has around a 100000 write cycle. You shouldn't rewrite the
460 firmware repeatedly and continually; that'll burn the EEPROM